|
Dimensione: 26897
Commento: Importata
|
Dimensione: 11070
Commento: + esempio "quiet splash" in /etc/default/grub
|
| Le cancellazioni sono segnalate in questo modo. | Le aggiunte sono segnalate in questo modo. |
| Linea 1: | Linea 1: |
| ## page was renamed from Grub2 | |
| Linea 3: | Linea 4: |
| [[BR]] [[WikiBanner(ArticoloInTraduzione)]] [[BR]] ||<tablestyle="float:right; font-size: 0.9em; background:#F1F1ED;margin: 0 0 1em 1em;" style="padding:2.0em;"><<TableOfContents>>|| |
<<BR>> <<Indice(depth=1)>> <<Informazioni(forum="http://forum.ubuntu-it.org/viewtopic.php?t=82907"; rilasci="17.10 16.04 14.04")>> |
| Linea 8: | Linea 8: |
| ''GRand Unified Bootloader, version 2'' (Grub 2) is the second version of GNU GRUB. It is the software responsible for loading and transferring control to the operating system kernel during the initial boot. Grub 2 is compatible with standard POSIX (GNU/Linux, *BSD, Mac OS, etc) and can also connect to systems incompatible with standard POSIX (Portable Operating System Interface for Unix). | = Introduzione = |
| Linea 10: | Linea 10: |
| GRUB 2 is a complete rewriting of the Grub interface. Based on the research project PUPA, GRUB 2 is more modular and portable that its predecessor. Some of the GRUB 2 scheduled improvements include: | '''GRUB''' è il [[http://it.wikipedia.org/wiki/Boot_loader|boot loader]] predefinito su Ubuntu. Gestisce e rende possibile l'avvio del sistema operativo. Nel caso sul disco siano presenti più sistemi (''multiboot''), permette di scegliere quale sistema operativo avviare attraverso il menù di '''GRUB'''. |
| Linea 12: | Linea 12: |
| * a graphical interface, including theming; * modular loading; * cross-platform compatibility; * scripting support; * user-customized boot entries; * revised partition naming. |
La versione attuale presenta grandi modifiche rispetto alla precedente. Le due versioni sono chiamate: * '''GRUB 2''': versione attuale del software a cui questa guida fa riferimento. * '''GRUB Legacy''': vecchia versione non più in sviluppo (vedi [[AmministrazioneSistema/Grub/Legacy|relativa guida]]). |
| Linea 19: | Linea 16: |
| == GRUB 2 Testing == | Comunemente si fa comunque riferimento alla versione 2 con il semplice appellativo '''GRUB'''. |
| Linea 21: | Linea 18: |
| Grub 2 is currently at version 1.96 so users still have time to contribute to its development. Follow this link and please help out with [[https://wiki.ubuntu.com/KernelTeam/Grub2Testing|GRUB 2 Testing.]] | = Panoramica = |
| Linea 23: | Linea 20: |
| == Installing / Upgrading == | Solitamente, quando Ubuntu è l'unico sistema presente nel computer, '''GRUB''' viene nascosto. Per mostrare '''GRUB''', in modo da accedere al suo menu, occorre quindi tenere premuto '''Shift''' (Maiusc) immediatamente dopo l'accensione del computer. |
| Linea 25: | Linea 22: |
| === Installing (Ubuntu 9.10) === | Se invece Ubuntu è installato in dual boot con altri sistemi, ad ogni avvio apparirà per qualche secondo il tipico menù di '''GRUB'''. |
| Linea 27: | Linea 24: |
| GRUB 2 will be installed by default on '''NEW''' installations of Karmic. If you have upgraded from '''Jaunty 9.04''' to '''Karmic 9.10''' you can follow the install instructions for Jaunty 9.04 below. | <<Anchor(menu)>> == Menù GRUB == |
| Linea 29: | Linea 27: |
| === Installing (Ubuntu 9.04+) === | Dal menù è possibile scegliere quale sistema avviare spostandosi con le frecce direzionali e premendo quindi il tasto '''Invio'''. |
| Linea 31: | Linea 29: |
| If you have any problems with upgrading Grub Legacy to Grub 2 from Jaunty to Karmic, follow this bug post... https://bugs.launchpad.net/ubuntu/+source/grub2/+bug/386789 | ||<tablestyle="width:100%" tableclass=noborder ><<Immagine(./grub2.png,500,center)>>|| Con le impostazioni predefinite sono presenti le seguenti voci: <<ElencoTabella(\n * '''Ubuntu''' (sistema predefinito per l'avvio)\n * '''Opzioni avanzate per Ubuntu''' (da cui è possibile avviare il sistema con versioni precedenti del kernel oppure in [[AmministrazioneSistema/ModalitaDiRipristino|modalità ripristino]]) \n * '''Memory test'''\n * Eventuali altre voci per ulteriori sistemi operativi presenti\n)>><<BR>>Se dopo alcuni secondi non si preme nessun tasto, viene avviato il sistema predefinito. Per avviare quest'ultimo senza attendere la scadenza dei secondi, premere semplicemente '''Invio'''.<<BR>><<BR>>L'esempio in figura riporta il tipico '''GRUB''' di Ubuntu, caratterizzato dallo sfondo violaceo, in un'installazione in lingua inglese. Si può notare la presenza di '''Ubuntu''' (posto in cima, quindi impostato per l'avvio) e '''Windows 7''' (evidenziato, quindi selezionato per l'avvio).|| |
| Linea 33: | Linea 31: |
| * Open a Terminal {{{ $ sudo apt-get install grub2 |
<<Anchor(installazione-sistema)>> == GRUB durante l'installazione == ||<tablestyle="text-align: justify; width:100%;" style="border:none;" 5%><<Immagine(Icone/Grandi/info.png,,center)>> ||<style="padding:0.5em; border:none;">Se non si ha familiarità con la tipologia delle partizioni in ambito Linux, consultare la guida [[Hardware/DispositiviPartizioni/Partizioni|Partizioni]].|| Durante l'installazione del sistema se si utilizzano le [[Installazione/InstallareUbuntu#auto|modalità automatiche]] di partizionamento, Ubuntu verrà automaticamente impostato per essere il sistema predefinito all'avvio. Se l'installazione avviene su di un computer con [[https://it.wikipedia.org/wiki/BIOS|BIOS]] tradizionale (o UEFI in modalità [[Installazione/UEFI#legacy|legacy]]), utilizzando il [[Hardware/DispositiviPartizioni/PartizionamentoManuale|partizionamento manuale]] sarà possibile scegliere "dove" installare '''GRUB'''.<<BR>> Questo può tornare utile ad es. in un'installazione dual boot di un sistema operativo secondario che non vogliamo come predefinito all'avvio. ||<tablestyle="text-align: justify; width:100%;" style="border:none;" 5%><<Immagine(Icone/Piccole/warning.png,,center)>> ||<style="padding:0.5em; border:none;">'''I seguenti passi non funzionano in modalità [[Installazione/UEFI|UEFI]]. Il nuovo sistema installato sarà comunque impostato come predefinito all'avvio.<<BR>>Vedere il [[#predefinito|paragrafo successivo]] per impostare il sistema predefinito all'avvio.'''|| ||<tablestyle="width:100%" tableclass=noborder ><<Immagine(./punti_mount.png,500,center)>>||Nella scelta dei [[Hardware/DispositiviPartizioni/PartizionamentoManuale#tabella|punti di mount]], dal menù a tendina evidenziato in figura, è possibile scegliere la collocazione del boot loader.<<BR>><<BR>>In questo caso è selezionato il disco '''/dev/sda''' e questo farà in modo che il sistema che stiamo installando sarà automaticamente il sistema predefinito all'avvio.<<BR>><<BR>>Dal menù a tendina è anche possibile assegnare specifiche partizioni ('''/dev/sda1''', '''/dev/sda2''', ecc..).<<BR>>Questo viene fatto quando installando un sistema secondario, '''non''' si vuole che sia il predefinito all'avvio. In tal caso si seleziona dal menù a tendina la partizione in cui verrà installato.<<BR>><<BR>>A fine installazione sarà necessario avviare il sistema principale e da [[AmministrazioneSistema/Terminale|terminale]] dare il comando '''sudo update-grub''' in modo che il menù venga aggiornato con il nuovo sistema installato.|| <<Anchor(predefinito)>> = Sistema predefinito all'avvio = Se si desidera impostare uno dei sistemi presenti sul disco come sistema principale all'avvio: 0. Avviare il proprio sistema ed effettuare il login. 0. Per rendere il sistema come predefinito all'avvio: * se i sistemi sono installati su di un '''unico disco''' digitare :{{{ sudo grub-install /dev/sda |
| Linea 37: | Linea 52: |
| * Select '''OK''' from grub-pc configuration * Select '''Chainload from menu.lst YES''' * At the linux command line, press '''ENTER''' NOTE: This is only temporary, you must make the changes permanent by doing this... * Type, in a terminal {{{ $ sudo upgrade-from-grub-legacy |
* se i sistemi sono installati su '''dischi differenti''' il comando sarà sempre del tipo:{{{ sudo grub-install /dev/sdX }}}È però importante verificare quale disco sia impostato nel [[Installazione/AvvioSupportoDiInstallazione|BIOS]] (o nello [[Installazione/UEFI|UEFI]]) come principale per l'avvio e quindi sostituire nel comando la dicitura '''/dev/sdX''' con quello appropriato fra '''/dev/sda''', '''/dev/sdb''', '''/dev/sdc''', ecc.. ||<tablestyle="text-align: justify; width:100%;" style="border:none;" 5%><<Immagine(Icone/Grandi/info.png,,center)>> ||<style="padding:0.5em; border:none;">Se non si ha familiarità con la tipologia delle partizioni in ambito Linux, consultare la guida [[Hardware/DispositiviPartizioni/Partizioni|Partizioni]].|| 0. Per aggiornare la lista dei sistemi avviabili, digitare nel [[AmministrazioneSistema/Terminale|terminale]]:{{{ sudo update-grub |
| Linea 48: | Linea 60: |
| GRUB 2 will then show you where it's booting from. {{{#!wiki warning NB! You have to use the spacebar to mark the choice here. DO NOT go on without doing this. Iw WILL result in your system showing error 15 and being unable to even show a boot menu. If you are running a dual boot system with WindowsXP or Vista, you might have to do additional fixes after upgrading to get it to work. }}} If this has already happened to you, take a look at this thread to possibly help fixing the problem: http://kubuntuforums.net/forums/index.php?topic=3106892.0 |
<<Anchor(windows-predefinito)>> == Windows predefinito all'avvio == |
| Linea 54: | Linea 63: |
| On my test system it displayed '''(hd0) /dev/sda''' but this might differ on your system. If this is incorrect, you must edit '''/boot/grub/device.map''' to match your system and then run {{{ $ sudo grub-install |
0. Aprire con i [[AmministrazioneSistema/Sudo|privilegi di amministrazione]] e con un [[Ufficio/EditorDiTesto|editor di testo]] il file `/etc/default/grub`. 0. Se non si sono fatte modifiche in precedenza si visualizzerà la riga:{{{ GRUB_DEFAULT=0 }}}Lo zero "'''0'''" sta a significare la prima posizione nel menù di '''GRUB''' e dovrà essere sostituito con il valore relativo alla posizione di Windows.<<BR>>Prendendo ad esempio la [[#menu|schermata]] mostrata in precedenza, iniziando a contare da zero da cima in basso, Windows risulta essere nella posizione "'''4'''". Il parametro, in questo caso, dovrebbe essere modificato nel seguente modo:{{{ GRUB_DEFAULT=4 }}}Salvare e quindi chiudere il file. 0. Per memorizzare la modifica, digitare il comando:{{{ sudo update-grub |
| Linea 59: | Linea 73: |
| GRUB 2 should be fully installed, with GRUB legacy removed, and it's configuration files backed up. GRUB legacy configuration files are located in '''/boot/grub''' and are named '''menu.lst*''' | ||<tablestyle="text-align: justify; width:100%;" style="border:none;" 5%><<Immagine(Icone/Piccole/note.png,,center)>> ||<style="padding:0.5em; border:none;">''Tale metodo può essere utilizzato anche per sistemi Linux, tuttavia così facendo non verrebbe automaticamente aggiornato il menù di '''GRUB''' quando dagli aggiornamenti si riceve un nuovo kernel. Ogni volta occorrerebbe fare login sul sistema in cui è stato modificato il file `/etc/default/grub` e dare il comando '''sudo update-grub'''. Per i sistemi Linux è preferibile utilizzare il [[#predefinito|metodo]] tramite comando '''grub-install'''.''|| |
| Linea 61: | Linea 75: |
| You can confirm the version you are installing at any time with: {{{ grub-install -v }}} == Grub 2 Files & Folders == While the main grub bootloader file continues to reside in the ''/boot/grub'' folder, it is no longer Grub's familiar ''menu.lst''. The main Grub 2 instruction file is now ''grub.cfg''. This file is produced by various scripts run when either the `"update-grub"` or `"update-grub2"` command is executed. The files primarily responsible for the content of ''grub.cfg'' are ''/etc/default/grub'' and individual script files located in ''/etc/grub.d/'' |
||<tablestyle="text-align: justify; width:100%;" style="border:none;" 5%><<Immagine(Icone/Piccole/warning.png,,center)>> ||<style="padding:0.5em; border:none;">'''Nel caso il menù risultasse per qualche motivo fuori uso consultare la guida sul [[AmministrazioneSistema/Grub/Ripristino|ripristino]].'''|| |
| Linea 68: | Linea 77: |
| Many of the files in ''/boot/grub'' will not be familiar to users of Grub Legacy. Especially noticeable are the multitude of *.mod files in the /boot/grub folder. Grub 2 is modular and the *.mod files are loaded as necessary by grub. Despite the addition of these files, the total size of the /boot/grub contents is fairly close to that of Grub Legacy and should not require a larger /boot partition. | = Impostazioni = |
| Linea 70: | Linea 79: |
| Con i [[AmministrazioneSistema/Sudo|privilegi di amministrazione]] e con un [[Ufficio/EditorDiTesto|editor di testo]] è possibile in base alle proprie esigenze modificare le impostazioni del file `/etc/default/grub`.<<BR>> Per approfondire si rimanda alla [[AmministrazioneSistema/Grub/FileCartelle#default_grub|seguente pagina]], di seguito si elencano giusto alcuni dei parametri più frequentemente personalizzati: * '''GRUB_DEFAULT''': settato su '''0''' avvia il sistema in cima alla lista del menù. Sostituendo '''0''' con '''1''', '''2''', '''3''', ecc.. si selezionano via via le voci di menù sottostanti. Per approfondire consultare la [[AmministrazioneSistema/Grub/FileCartelle#Submenu|seguente guida]]. * '''GRUB_TIMEOUT''': indica in secondi la durata del conto alla rovescia prima che il menù sparisca e il sistema di default si avvii. Di default è settato su '''10'''. * '''GRUB_CMDLINE_LINUX_DEFAULT''': questo parametro è spesso utilizzato per: * personalizzare l'avvio del sistema (ad esempio per disabilitare l'animazione di [[AmbienteGrafico/Plymouth|Plymouth]] modificando la voce '''"quiet splash"''' in '''"quiet"'''). * risolvere alcune problematiche relative alle configurazioni hardware. È consigliato consultare la [[Installazione/ParametriAvvio|relativa guida]]. |
|
| Linea 71: | Linea 87: |
| === grub.cfg (/boot/grub/grub.cfg) === {{{#!wiki warning '''DO NOT EDIT THIS FILE''' This is the main Grub 2 file. It "replaces" Grub Legacy's ''/boot/grub/menu.lst''. This file contains the Grub menu instructions. Unlike Grub Legacy's ''menu.lst'' file, '''''grub.cfg'' is NOT MEANT TO BE EDITED!!!''' |
Ogni modifica apportata ai file di configurazione, affinché abbia effetto, necessita del comando da [[AmministrazioneSistema/Terminale|terminale]]:{{{ sudo update-grub |
| Linea 77: | Linea 91: |
| * ''grub.cfg'' is automatically generated or updated whenever `"update-grub"` or `"update-grub2"` is executed. The command must be run as ''root''. * The scripts used to generate ''grub.cfg'' include the files contained in /etc/grub.d and information gathered from ''/etc/default/grub'' * The file is divided into sections. Each section of the file is clearly delineated and is recognizable by the section header ''### BEGIN''. The information on this line references the file in the ''/etc/grub.d'' folder which is used to incorporate the information into ''grub.cfg'' *By default, and whenever the `"update-grub2"` command is executed, this file is made ''read-only''. This is in keeping with the intent that the file should not be edited manually. If you must edit this file, instructions are provided later on this page. |
= Guide di approfondimento = |
| Linea 82: | Linea 93: |
| * Sample ''grub.cfg'' including two Ubuntu kernels, memtest86+, Windows and a custom entry (41_srcd) imported from an /etc/grub.d/ script: ~- {{{ # # DO NOT EDIT THIS FILE # # It is automatically generated by /usr/sbin/update-grub using templates # from /etc/grub.d and settings from /etc/default/grub # |
* [[AmministrazioneSistema/Grub/Ripristino|Ripristino]]: procedure di ripristino di '''GRUB'''. * [[AmministrazioneSistema/Grub/Installazione|Aggiornare a GRUB 2]]: guida per aggiornare da '''GRUB Legacy''' a '''GRUB 2'''. * [[AmministrazioneSistema/Grub/FileCartelle|File e cartelle]]: panoramica sui file di configurazione. * [[Installazione/ParametriAvvio|Parametri d'avvio]]: inserimento o modifica dei parametri di avvio al kernel. * [[AmministrazioneSistema/Grub/AggiungereTogliereVoci|Aggiungere e togliere voci]]: modifica delle voci di menù. * [[AmministrazioneSistema/Grub/Temi|Temi]]: installare nuovi temi. * [[AmministrazioneSistema/Grub/Errori|Problemi noti]]: panoramica su problemi noti che affliggono '''GRUB 2'''. |
| Linea 92: | Linea 101: |
| ### BEGIN /etc/grub.d/00_header ### set default=0 set timeout=5 set root=(hd0,5) search --fs-uuid --set b02e1934-12dd-418a if font /usr/share/grub/ascii.pff ; then set gfxmode=640x480 insmod gfxterm insmod vbe terminal gfxterm fi ### END /etc/grub.d/00_header ### |
= Ulteriori risorse = |
| Linea 105: | Linea 103: |
| ### BEGIN /etc/grub.d/05_debian_theme ### set menu_color_normal=cyan/blue set menu_color_highlight=white/blue ### END /etc/grub.d/05_debian_theme ### |
* [[http://www.gnu.org/software/grub/|Sito ufficiale di GRUB]] * [[http://www.gnu.org/software/grub/manual/html_node/|Manuale ufficiale di GRUB]] * [[AmministrazioneSistema/GrubCustomizer|Grub Customizer]] (programma con interfaccia grafica di terze parti per gestire e configurare le impostazioni di GRUB 2) * [[AmministrazioneSistema/ModalitaDiRipristino|Modalità di ripristino]] * [[http://upload.wikimedia.org/wikipedia/commons/c/cf/GRUB_with_ubuntu_and_windows_vista.png|Immagine utilizzata da Wikimedia sotto medesima licenza]] |
| Linea 110: | Linea 109: |
| ### BEGIN /etc/grub.d/10_hurd ### ### END /etc/grub.d/10_hurd ### ### BEGIN /etc/grub.d/10_linux ### set root=(hd0,5) search --fs-uuid --set b02e1934-12dd-418a-be3a-9ff7d3e7e7ea menuentry "Ubuntu, linux 2.6.28-13-generic" { linux /boot/vmlinuz-2.6.28-13-generic root=UUID=b02e1934-12dd-418a ro quiet splash vga800 initrd /boot/initrd.img-2.6.28-13-generic } menuentry "Ubuntu, linux 2.6.28-13-generic (single-user mode)" { linux /boot/vmlinuz-2.6.28-13-generic root=UUID=b02e1934-12dd-418a ro single initrd /boot/initrd.img-2.6.28-13-generic } menuentry "Ubuntu, linux 2.6.28-11-generic" { linux /boot/vmlinuz-2.6.28-11-generic root=UUID=b02e1934-12dd-418a ro quiet splash vga800 initrd /boot/initrd.img-2.6.28-11-generic } menuentry "Ubuntu, linux 2.6.28-11-generic (single-user mode)" { linux /boot/vmlinuz-2.6.28-11-generic root=UUID=b02e1934-12dd-418a ro single initrd /boot/initrd.img-2.6.28-11-generic } ### END /etc/grub.d/10_linux ### ### BEGIN /etc/grub.d/20_memtest86+ ### menuentry "Memory test (memtest86+)" { linux /boot/memtest86+.bin } menuentry "Memory test (memtest86+, serial console 115200)" { linux /boot/memtest86+.bin console=ttyS0,115200n8 } ### END /etc/grub.d/20_memtest86+ ### ### BEGIN /etc/grub.d/30_os-prober ### menuentry "Microsoft Windows XP Home Edition (on /dev/sda1)" { set root=(hd0,1) chainloader +1 } ### END /etc/grub.d/30_os-prober ### ### BEGIN /etc/grub.d/40_custom ### # This file is an example on how to add custom entries ### END /etc/grub.d/40_custom ### ### BEGIN /etc/grub.d/41_srcd ### menuentry "SystemRescue CD on hard drive" { set root=(hd0,10) linux /sysrcd/rescuecd subdir=sysrcd setkmap=us initrd /sysrcd/initram.igz } ### END /etc/grub.d/41_srcd ### }}} -~ === grub (/etc/default/grub) === This file contains information previously found in the upper section of ''/boot/grub/menu.lst''. It contains settings primarily affecting Grub's menu display. This file can be edited by ''root'' to make changes to these settings; they will be imported into ''grub.cfg'' when `"update-grub2"` is executed. ~- {{{ # If you change this file, run 'update-grub' afterwards to update # /boot/grub/grub.cfg. GRUB_DEFAULT=0 GRUB_HIDDEN_TIMEOUT=0 GRUB_HIDDEN_TIMEOUT_QUIET=true GRUB_TIMEOUT=10 GRUB_DISTRIBUTOR=`lsb_release -i -s 2> /dev/null || echo Debian` GRUB_CMDLINE_LINUX_DEFAULT="quiet splash" GRUB_CMDLINE_LINUX="" # Uncomment to disable graphical terminal (grub-pc only) #GRUB_TERMINAL=console # The resolution used on graphical terminal # note that you can use only modes which your graphic card supports via VBE # you can see them in real GRUB with the command `vbeinfo' #GRUB_GFXMODE=640x480 # Uncomment if you don't want GRUB to pass "root=UUID=xxx" parameter to Linux #GRUB_DISABLE_LINUX_UUID=true # Uncomment to disable generation of recovery mode menu entrys #GRUB_DISABLE_LINUX_RECOVERY="true" This file contains information formerly contained in the upper section of Grub Legacy's ''menu.lst'' and items contained on the end of the kernel line. The items in this file can be edited by a user with administrator (root) privileges. Grub developers have have placed explanatory comments within the file itself. }}} -~ * ''GRUB_DEFAULT=0'' * Sets the default and pre-selected menu entry. Entries may be numeric or ''saved'' * ''GRUB_DEFAULT=0'' * Sets the default menu entry by menu position. As with Grub Legacy, the first "menuentry" in grub.cfg is 0, the second is 1, etc. * ''GRUB_DEFAULT=saved'' * Sets the default menu entry with whatever was selected on the last boot. If the menu is displayed during boot, the previously selected option will be highlighted. If no action is taken, this is selection which will be booted at the end of the timeout, or if the menu is hidden. * ''GRUB_TIMEOUT=5'' * No change from Grub Legacy. This is the number of seconds before the default entry is automatically booted. * Setting a value of '''-1''' will display the menu until the user makes a selection (no timeout). * ''GRUB_HIDDEN_TIMEOUT=0'' * The menu will be hidden unless a ''#'' symbol is present at the beginning of this line. ( # GRUB_HIDDEN_TIMEOUT=0 ) * The default setting initially depends on the presence of other operating systems. * Another OS Detected: The menu will be displayed. ( The line will begin with a # symbol. ) * No other OS Detected: The menu will be hidden. * For integers greater than 0, the system will pause, but not display the menu, for the entered number of seconds. * 0 The menu will not be displayed. There will be no delay. *When this entry is set to 0: *The user may force displaying the menu as the computer boots by holding down the SHIFT key. *During boot, the system will check the SHIFT key status. If it cannot determine the key status, a short delay will enable the user to display the menu by pressing the ESC key. * If enabled, the splash screen designated in 05_debian_theme will be displayed even if the hidden menu feature is selected. * ''GRUB_HIDDEN_MENU_QUIET=true'' * true - No countdown is displayed. The screen will be blank. * false - A counter will display on a blank screen for the duration of the GRUB_HIDDEN_TIMEOUT value. * ''GRUB_DISTRIBUTOR''=`lsb_release -i -s 2> /dev/null || echo Debian` * Determines the descriptive name in the menu entry. (Ubuntu, Xubuntu, Debian, etc.) * ''GRUB_CMDLINE_LINUX'' * If it exists, this line imports any entries to the end of the ''linux'' command line (Grub Legacy's "kernel" line) for both normal and recovery modes. This is similar to the "altoptions" line in ''menu.lst'' * ''GRUB_CMDLINE_LINUX_DEFAULT''="quiet splash" *This line imports any entries to the end of the 'linux' line (Grub Legacy's "kernel" line). The entries are appended to the end of the normal mode only. This is similar to the "defoptions" line in ''menu.lst''. If you want a black screen with scrolling boot messages, remove "quiet splash". If you want a grub splash screen with limited messages underneath the Ubuntu logo, use only "splash". < ''This [only "splash"]will not work in Karmic during boot as the xsplash does not display the messages , but the messages at shutdown will be displayed.'' * ''#GRUB_TERMINAL''=console * Uncomment to disable graphical terminal (grub-pc only). * ''#GRUB_DISABLE_LINUX_UUID''=true * Uncomment this line if you don't want GRUB to pass "root=UUID=xxx" parameter to Linux. * ''GRUB_DISABLE_LINUX_RECOVERY=true'' * Add or uncomment this line to prevent "Recovery" mode kernel options from appearing in the menu. * ''GRUB_DISABLE_OS_PROBER=true'' * Enables/disables the os-prober check of other partitions for operating systems, including Windows, Linux, OSX and Hurd. === /etc/grub.d/ (folder) === The files in this folder are read during execution of '`"update-grub2"`'command. The scripts in these files export the information they gather into ''/boot/grub/grub.cfg'' The files are run in sequential order - files with names starting with a numeral are run first, followed by files whose name begins with a letter. The order the file is run determines the location of items in the grub menu. Custom entries can be added to the ''40_custom'' file or placed in a new file. Any file created must be executable in order to be included in the ''grub.cfg'' file during the `"update-grub2"` command. This can be accomplished from the terminal with `"sudo chmod u+x /etc/grub.d/filename"`. The following is a very brief look at what the files accomplish. * ''00_header'' * Loads settings from ''/etc/default/grub'', including visual presentations, timeout, and terminal options. * ''05_debian_theme'' * Sets background, text colors, and themes. * ''10_hurd'' * Locates hurd kernels. * ''10_linux'' * Locates kernels based on the distributor determined by the `"lsb_release -i -s"` results ("Ubuntu"). * ''20_memtest86+'' * If the file /boot/memtest86+.bin exists, it is included as a menu item. * ''30_os-prober'' * Searches for other OS's and includes them in the menu. * ''40_custom'' * A template for adding custom menu entries which will be inserted into ''grub.cfg'' upon execution of the `"update-grub2"` command. This and any other custom files must be made executable to allow importation into ''grub.cfg''. These files are placed in the Grub menu in the numerical order of the file name. == Adding Entries to Grub 2 == ''grub.cfg'' is updated when `update-grub` or `update-grub2` is run. Changes to ''grub.cfg'' should be made to the appropriate script files and not to the ''grub.cfg'' file itself. NOTE: The first comment in ''grub.cfg'' is ''"DO NOT EDIT THIS FILE"''. The file is '''read-only''' and is returned to this status anytime `update-grub` is run. === Automatic Entries === * When `"update-grub"` is executed, Grub 2 will read ''/etc/default/grub'' and the files in contained in the ''/etc/grub.d'' folder. This combination will set the visual parameters of the grub menu (''/etc/default/grub'') and search for linux kernels, other operating systems, and items designated in user-created scripts in ''/etc/grub.d''. The script files in ''/etc/grub.d'' perform the following tasks: * ''10_linux'' searches for installed linux kernels. * ''30_os-prober'' searches for other operating systems. * ''40_custom'' and any other user-created files in the ''/etc/grub.d folder'' add menu items designated in the script files created by users. * The name of the file determines the order in the menu. 30_os-prober entries will be placed before 40_custom entries, which will be placed before any higher-numbered entries. * Any user-created file must be made executable. This can be done as ''root'' by running {{{ sudo chmod u+x /etc/grub.d/filename }}} === User-defined Entries === Users with "root" privileges can create scripts in the ''/etc/grub.d/'' folder which will be incorporated into the ''grub.cfg'' file when `update-grub` is run. * The filename should normally take the format ''XX_name'', with ''XX'' being a number followed by an underscore and name. * The order the entry appears on the grub menu is based on numerical ordering of the files in ''/etc/grub.d''. Executable files in the ''/etc/grub.d'' folder beginning with an alphabetic character are placed in order ''following'' numerical entries. * The file must be made executable by typing in a terminal {{{ sudo chmod +x /etc/grub.d/'''filename''' }}} * A sample custom entry. This file creates menu items for running a SystemRescueCD installation on sdb10 and a custom kernel on sda1. '''NOTE:''' The new partition naming convention. Devices start counting from ''0'' as done previously. sd'''a''' is designated as "hd0", sd'''b''' is "hd1", etc. However the first ''partition'' is now designated as ''sda'''1'''''. Counting ''partitions'' does ''not'' start with "0". The '''fifth''' partition on ''sda'' is ''sda'''5'''''). ~- {{{ #!/bin/sh echo "Adding Custom Kernel & SystemRescue" >&2 cat << EOF menuentry "Ubuntu, linux 2.6.31-11-custom" { set root=(hd0,9) linux /boot/vmlinuz-2.6.31-11-custom root=UUID=c6829e27-2350-4e84-bdbb-91b83f018f98 ro initrd /boot/initrd.img-2.6.28-11-generic } menuentry "Boot SystemRescue CD from hard drive" { set root=(hd1,10) linux /sysrcd/rescuecd subdir=sysrcd setkmap=us initrd /sysrcd/initram.igz } EOF }}} -~ * The line ''"echo "Adding SystemRescueCD" >&2"'' is not required. Including it in the file allows this line to be seen in the terminal when `"update-grub2"` is executed. It provides visual feedback that the entry has been found and entered. The entry, if in the correct format, will be inserted in ''grub.cfg'' whether or not this line is included in the file. * Manual Editing of ''grub.cfg'' * If you ''must'' edit this file: {{{ sudo chmod +w /boot/grub/grub.cfg # Remove 'read-only', necessary even for "root" sudo nano /boot/grub/grub.cfg # Edit as "root" }}} * Note: This file is returned to 'read-only' status and user inputs are overwritten anytime the `"update-grub"` command is run. === Removing Entries from Grub 2 === Entries should be removed by editing or removing files in the ''/etc/grub.d folder''. The ''/boot/grub/grub.cfg'' file is read-only and should not normally be edited directly. * Automatically. * Kernels removed by Synaptic will automatically update ''grub.cfg'' and no user action is required. * Other operating systems which have been removed from the computer will also be removed from the menu once `"update-grub2"` is run as ''root''. * Manually. * To prevent a file in ''/etc/grub.d'' from adding items to the menu, remove the ''executable'' bit or remove the applicable file. * '''''memtest86+''''': If you don't want to have ''memtest86+'' displayed in your menu, run `sudo chmod -x /etc/grub.d/20_memtest86+`. The file will remain but will not be acted upon by ''update-grub''. * '''''Recovery mode:''''' If you don't want ''Recovery mode'' entries for your linux kernels, edit ''/etc/default/grub'' and add this line: {{{ GRUB_DISABLE_LINUX_RECOVERY=true }}} * If a custom script in the ''/etc/grub.d/'' folder contains multiple menu entries, individual items may be removed and others retained. * Tip: If the user wants his custom entries to appear at the top of the menu, the file can be named a value less than ''"10_linux"'', such as ''"07_custom"''. Check that the ''"DEFAULT"'' value in ''/etc/default/grub'' points to the correct ''menuentry'' after making this change. * Changes will not take effect on the Grub 2 menu until `"update-grub"` is run to update ''grub.cfg'' == Theming == '''As of version 1.96 of GRUB 2, theme support is not enabled''' The GRUB graphical menu supports themes that can customize the layout and appearance of the GRUB boot menu. The theme is configured through a plain text file that specifies the layout of the various GUI components (including the boot menu, timeout progress bar, and text messages) as well as the appearance using colors, fonts, and images. Take a look at this thread on [[http://ubuntuforums.org/showthread.php?t=1182436|Grub 2 Themeing]] === Splash Images === This is Colin Bennett's Google Summer of Code project. The [[http://grub.gibibit.com/|GRUB 2 graphical menu project]] aims to create a highly customizable graphical menu system for the GNU GRUB bootloader. Great link [[http://members.iinet.net/~herman546/p20/GRUB2%20Splashimages.html|here.]] === Background Colors/Image === Background colors and images are configured in a script located in '''/etc/grub.d/''' if you look in there you will find a file called '''05_debian_theme''' which is the default color scheme for GRUB 2. Now to create your own color scheme you have a few options, you can copy and edit the default 05_debian_theme or create your own script. All the files in /etc/grub.d/ are run in order, so if you have 2 theme files, 05_debian_theme and 06_mytheme, the latter (06_mytheme) will be run last, which will be the background you see. ==== Copy/Edit Default Colors ==== * Copy the default color theme {{{ $ sudo cp /etc/grub.d/05_debian_theme /etc/grub.d/05_debian_theme.BACKUP $ sudo nano /etc/grub.d/05_debian_theme }}} * Now you can edit the file to your hearts content. ==== Create a new theme file ==== * Create the new theme file {{{$ sudo nano /etc/grub.d/06_mytheme}}} * Now you can put whatever you want in here == Commands == As GRUB 2 has been totally re-written, there are now some commands you might be used to in GRUB legacy that don't exist in GRUB 2. Take a look at the Grub 2 Command's List [[http://grub.enbug.org/CommandList|here.]] '''SHIFT''' now allows you to interrupt 'sleep --interruptible', for consistency with the quick-boot scheme. == Recover Grub 2 via LiveCD == * First, grab a copy of the latest [[http://www.ubuntu.com/getubuntu/download|Ubuntu LiveCD]] and boot it. * Open a terminal and type {{{$ sudo fdisk -l}}} * Now, you need to remember which device listed is your linux distribution, for reference, /dev/sda1 will be used. Now we need to mount the filesystem to /mnt {{{$ sudo mount /dev/sda1 /mnt}}} *If you have /boot on a separate partition, that need's to be mounted aswell. For reference, /dev/sda2 will be used. {{{$ sudo mount /dev/sda2 /mnt/boot}}} ''Make sure you don't mix these up, pay attention to the output of FDISK'' Now mount the rest of your devices {{{$ sudo mount --bind /dev /mnt/dev}}} * Now chroot into your system {{{$ sudo chroot /mnt}}} You should be chroot'd into your system as root, you can now run commands as root, without the need for sudo. * Now you need to edit the '''/etc/default/grub''' file to fit your system {{{$ nano /etc/default/grub}}} * When that is done you need to run '''update-grub''' to create the configuration file. {{{$ update-grub}}} * To install GRUB 2 to the MBR, next you need to run '''grub-install /dev/sda''' {{{$ grub-install /dev/sda}}} * If you encounter any errors, try '''grub-install --recheck /dev/sda''' {{{$ grub-install --recheck /dev/sda}}} * Press Ctrl+D to exit out of the chroot. * Once you exit back to your regular console, undo all the mounting, first the /dev {{{$ sudo umount /mnt/dev}}} * Now you can unmount the root system {{{$ sudo umount /mnt}}} * And you should be free to restart your system right into GRUB 2 and then into your system installation. == Errors == === Where did my Grub2 boot menu go!?!?! === According to an email that was sent out today Monday, August 10, 2009 with the newest Grub2 update, the boot menu is hidden by default now. It's easy to get it back, just edit '''/etc/default/grub''' and comment out '''GRUB_HIDDEN_TIMEOUT''' {{{ $ sudo nano /etc/default/grub }}} Make your timeout line look like this... {{{ #GRUB_HIDDEN_TIMEOUT=3 GRUB_TIMEOUT=XXX <---Make sure you put in a timeout value here. }}} Save the file and exit, then run... {{{ $ sudo update-grub }}} === Dual-booting === Following this thread on the forums, users have seemed to come up with a Karmic work around for fixing your dual-boot problems... {{{ $ sudo apt-get install --reinstall libdebian-installer4 $ sudo os-prober $ sudo update-grub }}} === --no-floppy === It seems after an update yesterday Monday June 22, 2009 that some users are experiencing a --no-floppy error. There is a simple workaround to this. Check out this [[http://ubuntuforums.org/showthread.php?t=1194714&page=2|thread]] * Edit your boot command with '''E''' * Remove all entries of '''--no-floppy''' * Boot into Ubuntu and backup your GRUB 2 configuration {{{$ sudo cp /etc/grub/grub.cfg /etc/grub/grub.cfg.backup}}} * Then edit your configuration {{{$ sudo nano /etc/grub/grub.cfg}}} * Delete all entries of '''--no-floppy''' === unkown command 'initrd' === This error came after upgrading from Jaunty 9.04 to Karmic 9.10 on June 23, 2009. The work around was to remove the search line from the boot line. Take a look [[http://imagebin.ca/view/eCL6fVac.html|here]] and notice the '''search --fs-uuid''' line and remove it. * Press `E` to edit your boot line * Remove the `search --fs-uuid` line completely * Press `Ctrl-C` to enter the GRUB command line * Type in `insmod linux` and press `ENTER` * Press `ESC` to go back * `CTRL-X` to boot Once you get into your system you need to re-install grub to your device, mine was sda * `sudo grub-install /dev/sda` This fixed the problem and now booting is back to normal. === sleep 'invalid number 0.1' === '''***Fix released June 24, 2009***''' Floating sleeps was built in, but not configured in the newest version of busybox, here's the fix. * Add dupondje's [[https://launchpad.net/~dupondje/+archive/ppa|PPA]] {{{ deb http://ppa.launchpad.net/dupondje/ppa/ubuntu karmic main deb-src http://ppa.launchpad.net/dupondje/ppa/ubuntu karmic main }}} * Update & Upgrade {{{$ sudo apt-get update && sudo apt-get upgrade}}} * Update initramfs {{{$ sudo update-initramfs -uk all}}} === Error 11 === ==== After upgrading from GRUB Legacy ==== Error 11: Unrecognized device string... * press any key to continue * highlight "Chainload into GRUB 2" * press e * highlight "root xxxxxxxxxxxxxxxxxxxx" * press e * change "root xxxxxxxxxxxxxxxx" to "uuid xxxxxxxxxxxxxxxxxx" * press b to boot "uuid xxxxxxxxxxxxxxxxxxx" * load your kernel and press enter |
|
| Linea 518: | Linea 110: |
| CategoryNuoviDocumenti CategoryInTraduzione | CategoryAmministrazione |
Problemi in questa pagina? Segnalali in questa discussione
Introduzione
GRUB è il boot loader predefinito su Ubuntu. Gestisce e rende possibile l'avvio del sistema operativo. Nel caso sul disco siano presenti più sistemi (multiboot), permette di scegliere quale sistema operativo avviare attraverso il menù di GRUB.
La versione attuale presenta grandi modifiche rispetto alla precedente. Le due versioni sono chiamate:
GRUB 2: versione attuale del software a cui questa guida fa riferimento.
GRUB Legacy: vecchia versione non più in sviluppo (vedi relativa guida).
Comunemente si fa comunque riferimento alla versione 2 con il semplice appellativo GRUB.
Panoramica
Solitamente, quando Ubuntu è l'unico sistema presente nel computer, GRUB viene nascosto. Per mostrare GRUB, in modo da accedere al suo menu, occorre quindi tenere premuto Shift (Maiusc) immediatamente dopo l'accensione del computer.
Se invece Ubuntu è installato in dual boot con altri sistemi, ad ogni avvio apparirà per qualche secondo il tipico menù di GRUB.
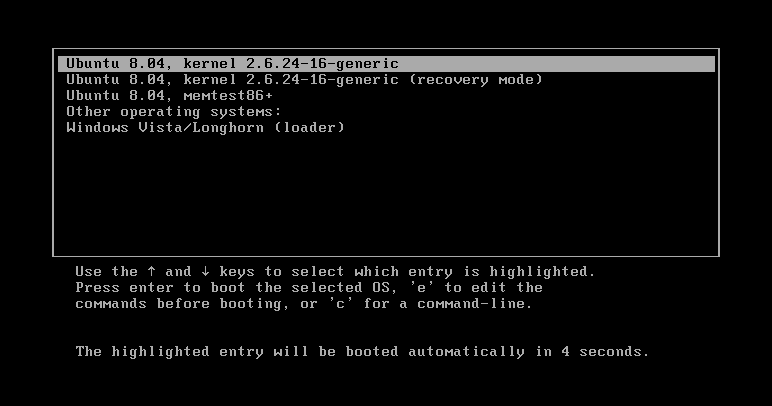
Menù GRUB
Dal menù è possibile scegliere quale sistema avviare spostandosi con le frecce direzionali e premendo quindi il tasto Invio.
|
Con le impostazioni predefinite sono presenti le seguenti voci:
|

GRUB durante l'installazione
|
Se non si ha familiarità con la tipologia delle partizioni in ambito Linux, consultare la guida Partizioni. |

Durante l'installazione del sistema se si utilizzano le modalità automatiche di partizionamento, Ubuntu verrà automaticamente impostato per essere il sistema predefinito all'avvio. Se l'installazione avviene su di un computer con BIOS tradizionale (o UEFI in modalità legacy), utilizzando il partizionamento manuale sarà possibile scegliere "dove" installare GRUB.
Questo può tornare utile ad es. in un'installazione dual boot di un sistema operativo secondario che non vogliamo come predefinito all'avvio.
|
I seguenti passi non funzionano in modalità UEFI. Il nuovo sistema installato sarà comunque impostato come predefinito all'avvio. |

|
Nella scelta dei punti di mount, dal menù a tendina evidenziato in figura, è possibile scegliere la collocazione del boot loader. |

Sistema predefinito all'avvio
Se si desidera impostare uno dei sistemi presenti sul disco come sistema principale all'avvio:
- Avviare il proprio sistema ed effettuare il login.
- Per rendere il sistema come predefinito all'avvio:
se i sistemi sono installati su di un unico disco digitare :
sudo grub-install /dev/sda
se i sistemi sono installati su dischi differenti il comando sarà sempre del tipo:
sudo grub-install /dev/sdX
È però importante verificare quale disco sia impostato nel BIOS (o nello UEFI) come principale per l'avvio e quindi sostituire nel comando la dicitura /dev/sdX con quello appropriato fra /dev/sda, /dev/sdb, /dev/sdc, ecc..

Se non si ha familiarità con la tipologia delle partizioni in ambito Linux, consultare la guida Partizioni.
Per aggiornare la lista dei sistemi avviabili, digitare nel terminale:
sudo update-grub
Windows predefinito all'avvio
Aprire con i privilegi di amministrazione e con un editor di testo il file /etc/default/grub.
Se non si sono fatte modifiche in precedenza si visualizzerà la riga:
GRUB_DEFAULT=0
Lo zero "0" sta a significare la prima posizione nel menù di GRUB e dovrà essere sostituito con il valore relativo alla posizione di Windows.
Prendendo ad esempio la schermata mostrata in precedenza, iniziando a contare da zero da cima in basso, Windows risulta essere nella posizione "4". Il parametro, in questo caso, dovrebbe essere modificato nel seguente modo:GRUB_DEFAULT=4
Salvare e quindi chiudere il file.Per memorizzare la modifica, digitare il comando:
sudo update-grub
|
Tale metodo può essere utilizzato anche per sistemi Linux, tuttavia così facendo non verrebbe automaticamente aggiornato il menù di GRUB quando dagli aggiornamenti si riceve un nuovo kernel. Ogni volta occorrerebbe fare login sul sistema in cui è stato modificato il file /etc/default/grub e dare il comando sudo update-grub. Per i sistemi Linux è preferibile utilizzare il metodo tramite comando grub-install. |

|
Nel caso il menù risultasse per qualche motivo fuori uso consultare la guida sul ripristino. |
Impostazioni
Con i privilegi di amministrazione e con un editor di testo è possibile in base alle proprie esigenze modificare le impostazioni del file /etc/default/grub.
Per approfondire si rimanda alla seguente pagina, di seguito si elencano giusto alcuni dei parametri più frequentemente personalizzati:
GRUB_DEFAULT: settato su 0 avvia il sistema in cima alla lista del menù. Sostituendo 0 con 1, 2, 3, ecc.. si selezionano via via le voci di menù sottostanti. Per approfondire consultare la seguente guida.
GRUB_TIMEOUT: indica in secondi la durata del conto alla rovescia prima che il menù sparisca e il sistema di default si avvii. Di default è settato su 10.
GRUB_CMDLINE_LINUX_DEFAULT: questo parametro è spesso utilizzato per:
personalizzare l'avvio del sistema (ad esempio per disabilitare l'animazione di Plymouth modificando la voce "quiet splash" in "quiet").
risolvere alcune problematiche relative alle configurazioni hardware. È consigliato consultare la relativa guida.
Ogni modifica apportata ai file di configurazione, affinché abbia effetto, necessita del comando da terminale:
sudo update-grub
Guide di approfondimento
Ripristino: procedure di ripristino di GRUB.
Aggiornare a GRUB 2: guida per aggiornare da GRUB Legacy a GRUB 2.
File e cartelle: panoramica sui file di configurazione.
Parametri d'avvio: inserimento o modifica dei parametri di avvio al kernel.
Aggiungere e togliere voci: modifica delle voci di menù.
Temi: installare nuovi temi.
Problemi noti: panoramica su problemi noti che affliggono GRUB 2.
Ulteriori risorse
Grub Customizer (programma con interfaccia grafica di terze parti per gestire e configurare le impostazioni di GRUB 2)
